Installing XSS Hunter
As most of you likely already know, you can register and use xsshunter for free at https://xsshunter.com/. As a quick recap, this is a tool mostly used for hunting blind XSS. So why would you want to host your own instance? I will review why you should and how to do it in this technical guide.


UPDATE: NEW AND AMAZING THINGS HAVE HAPPENED:
A new version has been released using docker and updated UI, check it here:
Amazing new XSS Hunter
Why?
As most of you likely already know, you can register and use xsshunter for free at https://xsshunter.com/.
As a quick recap, this is a tool mostly used for hunting blind XSS.
So why would you want to host your own instance?
- Full control. If something goes wrong, you can check and investigate.
- Stability. You know if the service is up or not. You also decide when to stop running it. Imagine having hundreds of valid payloads ready to execute, then the maintainer takes it down. That would be unfortunate.
- You control the data. Companies generally do not like reporters using 3rd party solutions since they cannot verify if data actually is removed or not
Bonus point - you get to learn how it works and how it is designed

How?
There is a link to a guide available at the XSS Hunter github page
It is a great starting point, but it is quite dated. The same is true for the codebase, so in order to run on Ubuntu 18.04, I had to make various changes. I will walk you through how to get it working in this guide.
Initial steps
I will base this on the original guide.
I will also assume that you have a working server and some basic server management experience. I will still try to go quite in depth though. Please also feel free to ask questions!
What you need:
- A VPS or somewhere to host the service
- A domain name (Can be bought many places. Here are some: 1, 2, 3)
- A wildcard certificate. Get one for the domain you bought by following this guide. There is also official documentation here
Installing XSS Hunter
Getting a mailgun account
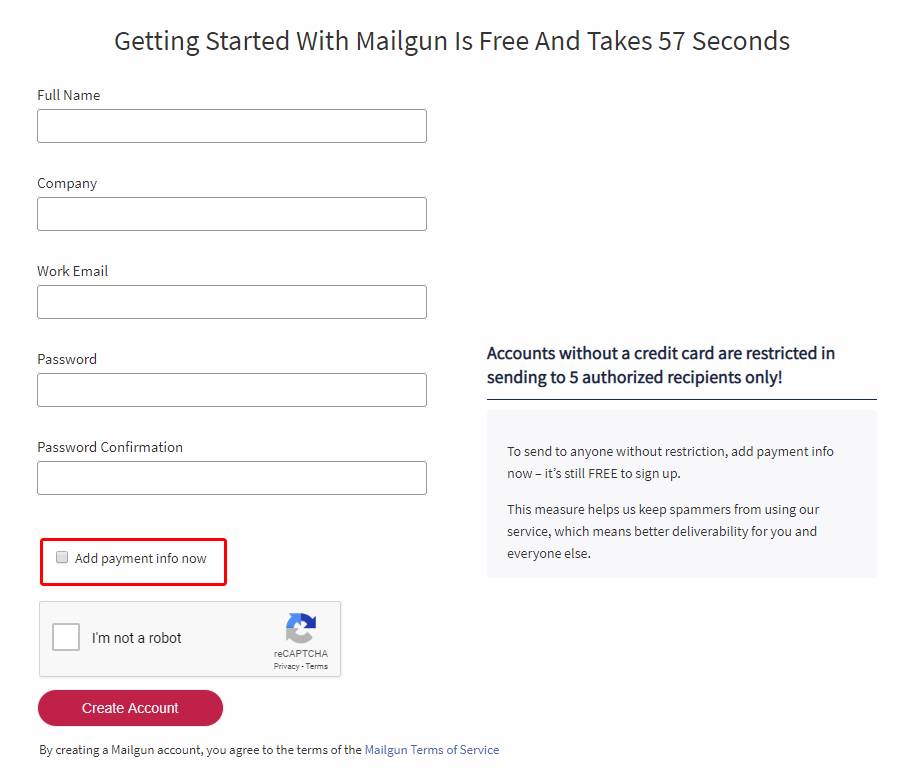
- Register a mailgun account here - Remeber to uncheck the box marked below!
- Follow the instructions to verify your email address and phone number
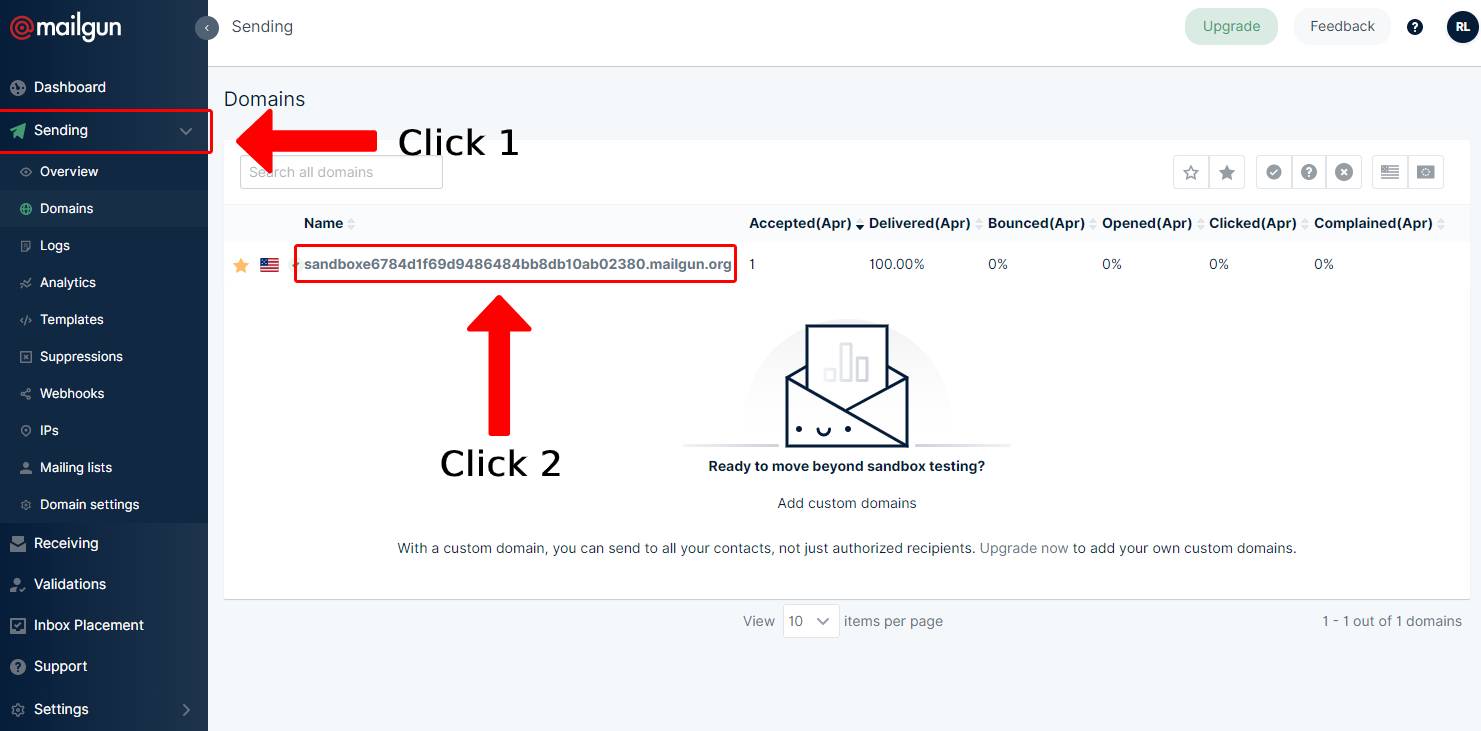
- Go to the sending tab and click on your email domain
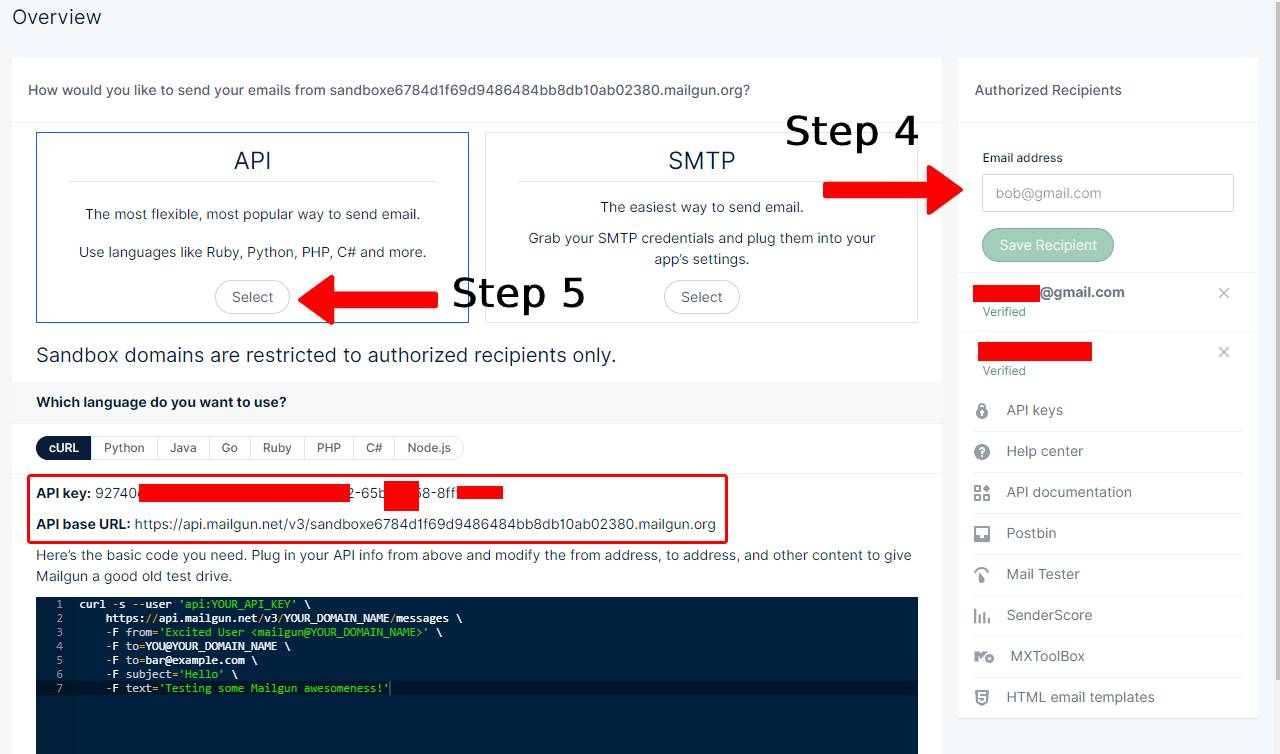
- On the right hand side of the screen, add the email addresses that you want to receive alerts to. This is your actual email adress. For example: john.doe@gmail.com
- After having completed the above, click the select button within the square that says API.
- Note down your API key and your email domain - you will need it soon!
- The email domain is the final part of the API base URL
sandboxe678...
- The email domain is the final part of the API base URL
- Go to your email inbox and open the email from mailgun
- Verify the email address by clicking the link you receive from mailgun. (It will be sent to the address you specify, in the above example john.doe@gmail.com)
Confirm that it works
Use the following command to send an email from your server, to check that the service is working.
Replace the following:
[API_KEY] : Your API key
[API_BASE_URL] : Your API base URL
[YOUR_EMAIL] : Your real email address. For example: john.doe@gmail.com
curl -s --user 'api:[API_KEY]' \
	https://api.mailgun.net/v3/[API_BASE_URL]/messages \
	-F from='Excited User <mailgun@[API_BASE_URL]>' \
	-F to=[YOUR_EMAIL] \
	-F subject='Hello' \
-F text='Testing some Mailgun awesomeness!'Note of caution. The EU version of the service has a different URL. A quick google search or checking your mailgun account should show you what needs to be changed.
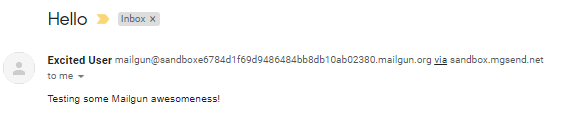
Check your email account to make sure you received an email like the below. If not, you need to do further troubleshooting before continuing
Setting up dependencies
First, install the necessary packages
# install dependencies
sudo apt-get install nginx && sudo apt-get install postgresql postgresql-contrib
Then, set up postgres user and database for XSS Hunter. Change EXAMPLE_PASSWORD with a secure password of your choosing. Please keep this for later! I recommend using a password manager!
sudo -i -u postgres
psql template1
CREATE USER xsshunter WITH PASSWORD 'EXAMPLE_PASSWORD';
CREATE DATABASE xsshunter;
\q
exitInstall the service
First, let's clone the repo:
git clone https://github.com/mandatoryprogrammer/xsshunter
cd xsshunterDo note - Python2 is required! It does not support Python3
In order to get the configuration script running, we need to add an additional dependency.
# install yaml support for python
sudo apt-get install pyyamlCredit to xYantix for giving a working solution in this pull-request
Configure the service
OK, let us proceed. We are ready to run the configuring script!
# generate yaml config file
./generate_config.pyI will take you through it step by step. To see an example of the output, please see below. In the example output, I have added numbers for easy reference. Otherwise everything should look identical.
- Input your domain name. I have used mydomain.com as an example
- Enter your Mailgun API key, which you found and saved earlier
- Enter your Mailgun Domain Name, which you also wrote down earlier. (The one starting with sandbox)
- I believe this could be anything@[Mailgun Domain Name], but I stuck with the default from mailgun here, as it does not really matter. I suggest going with: mailgun@[Mailgun Domain Name]. Remember to replace [Mailgun Domain Name] with your actual value
- This is for people to report suspected abuse of the tool. This email should be one you already manage and have access to. For example: john.doe@gmail.com
- If you followed this guide, just input xsshunter
- Input the password you chose when you created the database. This is referenced as EXAMPLE_PASSWORD above. Please replace [YOUR_REALLY_SECURE_PASSWORD] with the value you chose for EXAMPLE_PASSWORD
- Same as in step 6, if you followed this guide, just input xsshunter
Woop, setup done!
If you ever need to change these values, you can edit them directly in the config.yaml file
 __   __ _____ _____   _    _             _
 \ \ / // ____/ ____| | |  | |           | |
  \ V /| (___| (___   | |__| |_   _ _ __ | |_ ___ _ __
   > <  \___ \\\\___ \  |  __  | | | | '_ \| __/ _ \ '__|
  / . \ ____) |___) | | |  | | |_| | | | | ||  __/ |
 /_/ \_\_____/_____/  |_|  |_|\__,_|_| |_|\__\___|_|


	                                           Setup Utility

	(1)
    What is the base domain name you will be using?
	(ex. localhost, www.example.com)
	Domain? mydomain.com

	Great! Now let's setup your Mailgun account to send XSS alerts to.

	(2)
	Enter your API key:
	(ex. key-8da843ff65205a61374b09b81ed0fa35)
	Mailgun API key: 92740xxxxxxxxxxxxxxxxxxxxxxxxxxx-65bxxx58-8ffxxxxx

	(3)
	What is your Mailgun domain?
	(ex. example.com)
	Mailgun domain: sandboxe6784d1f69d9486484bb8db10ab02380.mailgun.org

	(4)
    What email address is sending the payload fire emails?:
	(ex. no-reply@example.com)
	Sending email address: mailgun@sandboxe6784d1f69d9486484bb8db10ab02380.mailgun.org

	(5)
    Where should abuse/contact emails go?:
	(ex. yourpersonal@gmail.com)
	Abuse/Contact email: xsshunter@mydomain.com

    (6)
	What postgres user is this service using?
	(ex. xsshunter)
	Postgres username: xsshunter

	(7)
	What is the postgres user's password?
	(ex. @!$%@^%UOFGJOEJG$)
	Postgres password: [YOUR_REALLY_SECURE_PASSWORD]

	(8)
	What is the postgres user's DB?
	(ex. xsshunter)
	Postgres DB: xsshunter

	Generating cookie secret...
	Minting new nginx configuration file...

	Setup complete! Please now copy the 'default' file to /etc/nginx/sites-enabled/default
	This can be done by running the following:
	sudo cp default /etc/nginx/sites-enabled/default

	Also, please ensure your wildcard SSL certificate and key are available at the following locations:
	/etc/nginx/ssl/mydomain.com.crt; # Wildcard SSL certificate
	/etc/nginx/ssl/mydomain.com.key; # Wildcard SSL key

Good luck hunting for XSS!You should now have 2 new files in your xsshunter folder:
config.yaml(contains API keys and credentials)default(contains the nginx configuration)
NGINX configuration
Change SSL Certificate location
If you are also using Let's Encrypt, you will need to modify the default file.
In order to make the config work with Let's Encrypt default settings, we have to comment out all occurrences of:
/etc/nginx/ssl/mydomain.com.crt; # Wildcard SSL certificate
/etc/nginx/ssl/mydomain.com.key; # Wildcard SSL key
and replace it with
ssl_certificate /etc/letsencrypt/live/mydomain.com-0001/fullchain.pem ; # managed by Certbot
ssl_certificate_key /etc/letsencrypt/live/mydomain.com-0001/privkey.pem; # managed by Certbot
Notes
- replace mydomain.com with your domain name!
- Everything after # is just for comments. You can remove them if you want.
Your default file should look like the following now:
server {
    # Redirect HTTP to www
    listen 80;
    server_name mydomain.com;
    location / {
        rewrite ^/(.*)$ https://www.mydomain.com/$1 permanent;
    }
}

server {
    # Redirect payloads to HTTPS
    listen 80;
    server_name *.mydomain.com;
    proxy_set_header X-Forwarded-For $remote_addr;

    return 307 https://$host$request_uri;
    client_max_body_size 500M; # In case we have an extra large payload capture
}

server {
    # Redirect HTTPS to www
    listen 443;
    ssl on;

    # New conf
    ssl_certificate /etc/letsencrypt/live/mydomain.com-0001/fullchain.pem; # managed by Certbot
    ssl_certificate_key /etc/letsencrypt/live/mydomain.com-0001/privkey.pem; # managed by Certbot

    # Original conf
    #ssl_certificate /etc/nginx/ssl/mydomain.com.crt; # Wildcard SSL certificate
    #ssl_certificate_key /etc/nginx/ssl/mydomain.com.key; # Wildcard SSL certificate key

    server_name mydomain.com;
    location / {
        rewrite ^/(.*)$ https://www.mydomain.com/$1 permanent;
    }
}

server {
    # API proxy
    listen 443;
    ssl on;

    # New conf
    ssl_certificate /etc/letsencrypt/live/mydomain.com-0001/fullchain.pem; # managed by Certbot
    ssl_certificate_key /etc/letsencrypt/live/mydomain.com-0001/privkey.pem; # managed by Certbot

    # Original conf
    #ssl_certificate /etc/nginx/ssl/mydomain.com.crt; # Wildcard SSL certificate
    #ssl_certificate_key /etc/nginx/ssl/mydomain.com.key; # Wildcard SSL certificate key

    server_name *.mydomain.com;
    access_log /var/log/nginx/mydomain.com.vhost.access.log;
    error_log /var/log/nginx/mydomain.com.vhost.error.log;

    client_max_body_size 500M;

    location / {
        proxy_pass  http://localhost:8888;
        proxy_set_header Host $host;
        proxy_set_header X-Forwarded-For $remote_addr;
    }
}

server {
    # Redirect api to HTTPS
    listen 80;
    server_name api.mydomain.com; # Subdomain for API server
    proxy_set_header X-Forwarded-For $remote_addr;

    return 307 https://api.mydomain.com$request_uri;
    client_max_body_size 500M; # In case we have an extra large payload capture
}

server {
   # Redirect www to HTTPS
   listen 80;
   server_name www.mydomain.com;
   location / {
       rewrite ^/(.*)$ https://www.mydomain.com/$1 permanent;
   }
}

server {
   # GUI proxy
   listen 443;
   server_name www.mydomain.com;
   client_max_body_size 500M;
   ssl on;

   # New conf
   ssl_certificate /etc/letsencrypt/live/mydomain.com-0001/fullchain.pem; # managed by Certbot
   ssl_certificate_key /etc/letsencrypt/live/mydomain.com-0001/privkey.pem; # managed by Certbot

   # Original conf
   #ssl_certificate /etc/nginx/ssl/mydomain.com.crt; # Wildcard SSL certificate
   #ssl_certificate_key /etc/nginx/ssl/mydomain.com.key; # Wildcard SSL certificate key


   location / {
       proxy_pass  http://localhost:1234;
       proxy_set_header Host $host;
   }
}Enable NGINX config
The next step is to move the file into the nginx folder. It is considered good practice to have config files in .../sites-available and then symlink the configurations you are using to .../sites-enabled, so that is what we will do.
I also like naming the configuration file so I know what service it belongs to.
Following is how to do it!
# move file and give proper name
cp xsshunter/default /etc/nginx/sites-available/xsshunter-mydomain.com

# symlink the file to sites-enabled to make it active
ln -s /etc/nginx/sites-available/xsshunter-mydomain.com /etc/nginx/sites-enabled/xsshunter-mydomain.com

# test for errors in the configuration
sudo nginx -t

# if no errors, restart nginx for changes to take effect
sudo systemctl restart nginxIf you have never ran nginx before, the last command should be the following instead:
sudo systemctl start nginx
Installing the API server
First, the API server needs certain dependencies as well.
The guide said to run the following command:
sudo apt-get install python-virtualenv python-dev libpq-dev libffi-dev
Please execute it.
Unfortunately, that did not allow me to run the virtualenv command, so I installed it using the following command:
pip install virtualenv
That resolved the issue and allowed me to continue.
Let's proceed by moving into the right directory.
Once in the right directory, we need to create our virtual environment.
Here is how to do so:
# change folder - you know that already!
cd xsshunter/api

# find your Python2 executable path
which python2

# create a python2 virtual environment in the env folder
virtualenv -p MY/EXECUTABLE/PATH envPlease make sure that you change MY/EXECUTABLE/PATH in the last command to whatever the output of the
which python2was. For me it was/usr/bin/python2.
After we have made the virtual environment, activate it by using the following command. You should see your command line change.
# activate environment
. env/bin/activate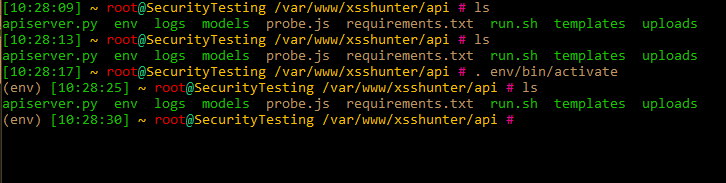
There are also some dependency issues since the repository is not actively maintained.
As such, we have to make the following changes in requirements.txt:
psycopg2==2.6.1=>psycopg2==2.7.3.1bcrypt==2.0.0=>bcrypt==3.1.7
Use your favorite text editor to achieve the above. I use VIM.
Once that is done, it is time to install all dependencies and run the API server to make sure everything is working as expected. Let us try!
# install requirements
pip install -r requirements.txt

# run the API server
./apiserver.pyThe install command should print some data. The api-server should not output anything. No output is good news!
We want to make one more change before we have finished setting up the api server. Originally it listens on interface 0.0.0.0 but we are proxying through NGINX, meaning there is no point in doing so. We will change it to listen on localhost instead. This avoids confusion and any potential issues.
Using a text editor, change line 684 in apiserver.py from
app.listen( 8888 ) to app.listen( 8888, "localhost" )
Thanks to swarley7, for sharing this in this pull request
Finally: There is a bug where uploads does not work properly, if the /uploads folder does not exists. It is shared by sampsonc in this pull request.
Let us create the folder, then move on!
# create uploads folder
mkdir xsshunter/api/uploadsInstalling the GUI server
This process is very similar to that of the api server, just easier.
We change into the gui folder, create a virtual environment, activate it, and install the requirements.
# change folder - you know that already!
cd xsshunter/gui

# find your Python2 executable path
which python2

# create a python2 virtual environment in the env folder
virtualenv -p MY/EXECUTABLE/PATH env

# activate environment
. env/bin/activate

# install requirements
pip install -r requirements.txt

# run the GUI server
./guiserver.pyAgain, the same as when installing the API server:
Please make sure that you change MY/EXECUTABLE/PATH in the last command to whatever the output of the
which python2was. For me it was/usr/bin/python2
Here too, no output when running ./guiserver is good news.
Also, similarly to the API server we want to proxy all connections through NGINX, so there is no need for the server to listen on the 0.0.0.0 interface.
Using a text editor, change line 70 in guiserver.py from
app.listen( 1234 ) to app.listen( 1234, "localhost" )
Final touches
The first step is to run both servers. The original blog post suggest using tmux. It is not ideal for production, but hey, we're hackers so let's do it anyways ! If you want a more stable service, I will leave it as an exercise for you.
Here is how to run it using tmux. If you need some help, this is a really good cheatsheet!
# start a session
tmux session -new xsshunter

# change to api directory
cd xsshunter/api

#run api server
./apiserver

# open new pane
[ctrl]+[b] -> [c]

# change to gui directory
cd xsshunter/gui

# run gui server
./guiserver

# detach from session
[ctrl]+[b] -> [d]

# extra: if you want to open the session again
tmux attach-session -t xsshunterOnly one thing left to do
Access your domain and see if you are greeted with the xsshunter page!
It should look just like the front page of xsshunter.com
You did it?
Congratulations!
Time to celebrate with a beer!

If you haven't watched Entourage yet, do yourself a favor and celebrate your success by starting now!
Final note
I don't like running things as root / normal users, so in order to run this as www-data I made the following script to make running it a little easier.
Replace apiserver.py with guiserver.py to have one for each server. Feel free to use it!
#!/bin/sh
. env/bin/activate && python apiserver.py# execute script above as www-data user
sudo -u www-data ./run.shDONE!
Thank you for reading, I hope this was helpful!
As always, have a puppy picture for your effort!
Until next time!
Cheers!